Please note that documentation is in a draft state. It is being updated, and the latest version of this book can always be found at GitHub at User Guide at GitHub.
Your First Hour with Nocturne Writer
This guide is intended to walk you through setting up your Nocturne Writer environment and get you started writing and creating as quickly as possible. Let’s start with an overview of the user interface.
Section 1: Getting Started
Step 1: Create a new book
-
Create a new book using the Launcher:
File -> Show Launcher -
Set the name of the project, and browse to the location on your computer that you want to save the project. Once you have selected a location, you will see the full path to the book on your computer. You can see the folder location later by accessing book information from the File menu (
File -> Book Info...). -
It’s recommended that you enable version history so that you can benefit from the full capabilities of the application to help manage your content and revisions.
-
Click on the
Create Bookbutton and your book will open in a new Nocturne Writer window.
Step 2: Setup Git version control
The application uses the popular Git version control system to manage revisions to your content. Visit git-scm.com for more information about Git.
For Git to work properly, you need to setup your identity so that content you create and revisions you make can be attributed to you. This will become important in the future if you decide to work collaboratively with other writers on the same project. We have no access to this information and it is not shared with us - it remains with you.
-
If you weren’t already prompted to enter your name and email address, then you access version control settings from the Settings menu (
Settings -> Version Control). If you have already setup your identity then you can disregard the next steps, although you may want to follow along for future reference. -
A new tab called Settings opens up on the Version Control section. You can enter your name and email address here, and click on
Apply and Save. -
Leave the other settings as they are; after you’ve had a chance to try out some of the version control workflows you can come back and update other settings here if you want.
Section 2: Navigating the Interface
Figure 1, below, highlights the main areas in the application’s user interface.
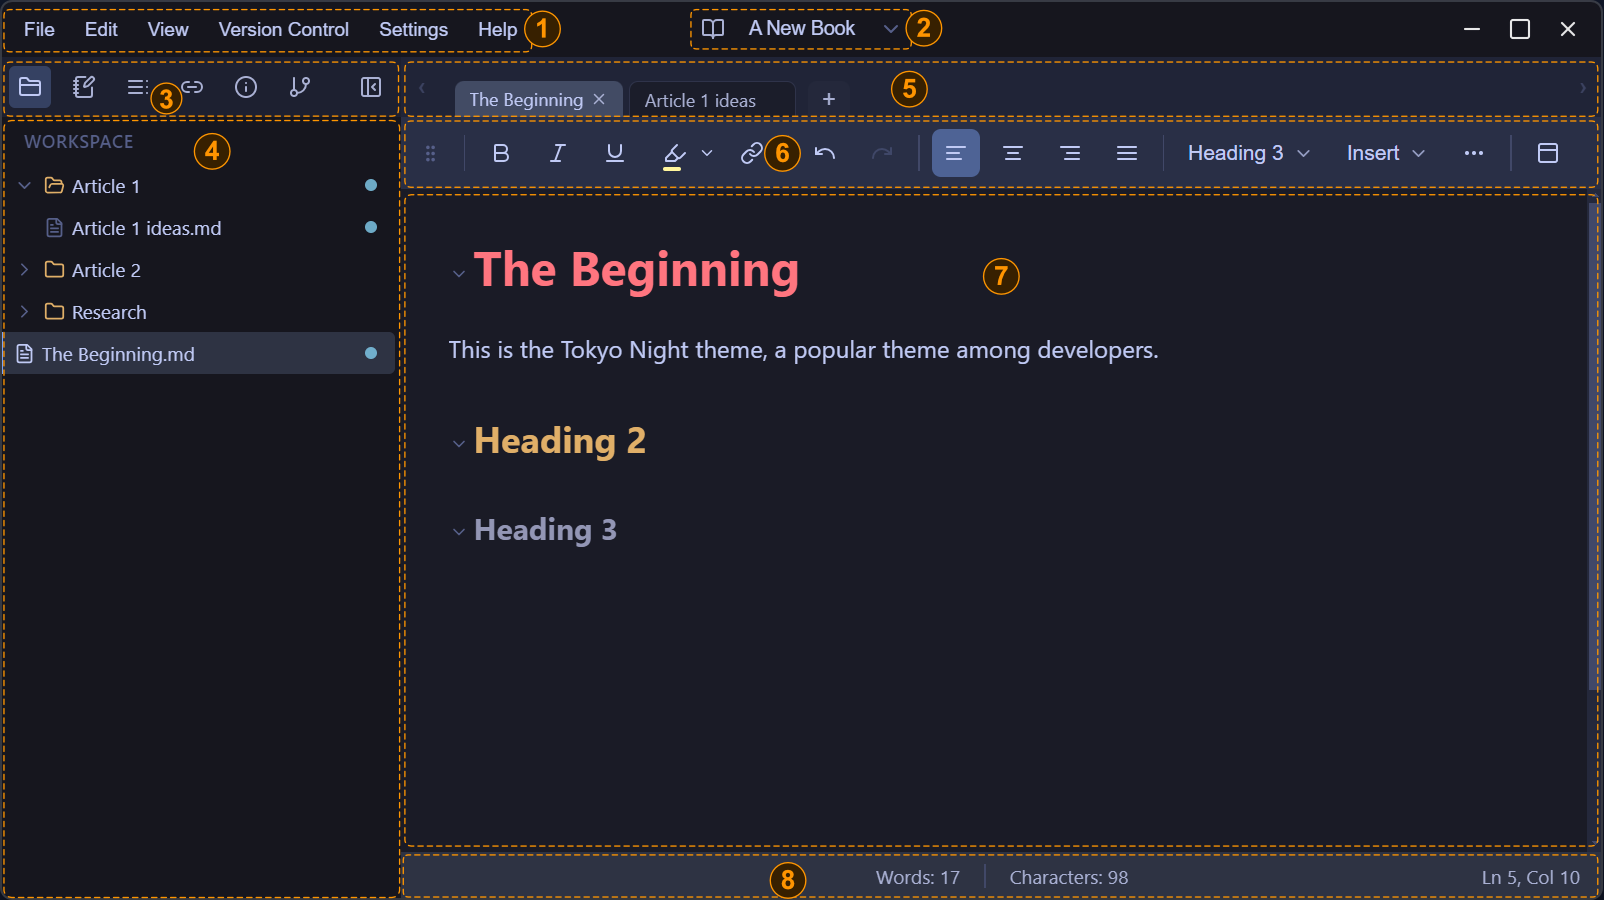
1: Main Menu
The main menu has similar commands to other applications that you would be familiar with. Several commands that are immediately useful:
-
To open an existing book:
File -> Show Launcher -
To change the application theme:
Settings -> Theme Library -
To access this User Guide:
Help -> User Guide
2: Book Switcher
Also in the top application bar, the Book Switcher lets you quickly access recent books, open an existing book, and close the current book.
3: Multi-Panel Toolbar
The multi-panel toolbar provides access to a set of six panels that provide key sets of functionalities. From left to right:
-
Workspace: This is the default panel that opens when you open Nocturne Writer. It provides access to the main files and folders that contain your work.
-
Scratchpad: The Scratchpad looks and behaves similarly to the Workspace. The key difference is that files created in this area are not subject to version control. This makes it easy to create fleeting notes, ephemeral content, or work that you just aren’t sure if you want to keep, without cluttering up your book’s version history. However, if you delete a file from this section, it is gone forever. You cannot use version control to recover it. You can ‘promote’ files from the Scratchpad to the Workspace, where they are then subject to version control.
-
Navigator: The Navigator presents a heading (H1 to H6) view of the structure of your page, letting you navigate through the document by clicking on the headings in the panel. This outline view lets you expand and collapse headings, and drag and drop headings so that you can reorganize and restructure your document.
-
Backlinks: Internal document linking is an important part of the Nocturne Writer experience. The Backlinks panel lets you see and navigate to all documents that link to the currently open document.
-
Metadata: Manage document tags and metadata, and add/remove custom metadata fields.
-
Version Control: Manage version history of active and deleted documents.
-
The final button in the the multi-panel toolbar collapses the left panel to a set of icons along the left side of the application. Clicking any of those icons restores and opens the left panel to the selected function.
Note that if the panel width is too narrow to display all the buttons, then clicking on the chevron that appears when the panel width is reduced will display the other buttons in a dropdown menu.
4: Left Panel
Selecting one of the buttons in the toolbar above will update the left panel to the selected view. The panel is always open by default, but as mentioned above can be collapsed. You can also shrink the width of the panel by moving your mouse over the border between the left panel and editor, and then dragging the width of the left panel to your desired size. Note that there are minimum and maximum width limits to keep the UI functional.
5: Tab Bar
All your open tabs from the Workspace and Scratchpad are displayed in the tab bar. Opening Settings will also create a new tab in the tab bar. The currently selected tab is always highlighted. Tabs can be reordered by dragging and dropping on the tab bar, and right-clicking on the a tab displays a set of available options to pin and close tabs. Pinning a tab sends it to the left, locking it in place to ensure that it won’t be closed. Tabs that are open when a book closes will be reopened the next time that book is opened.
There are left-pointing and right-pointing chevrons at either end of the toolbar. When there are more tabs in the tab bar than can be displayed, these buttons will be enabled to let you scroll through the list of open tabs.
6: Floating Toolbar
The floating toolbar provides access to all document and formatting and editing commands and tools. In the screenshot, the toolbar is shown as docked - parked underneath the tab bar. However, it is called the floating toolbar because you can click on the left drag point of the toolbar and reposition it anywhere you want on the screen. The rightmost button also lets you dock and undock the toolbar. When the toolbar is undocked, clicking that button automatically returns it to the docking position.
From left to right, the zones and buttons are as follows:
-
Drag icon
-
Formatting and linking: Bold, Italic, Underline, Highlight (dropdown), and Link.
-
Undo and Redo
-
Content alignment: Left, Center, Right, Justified
-
Block styles: The block style dropdown lets you set a style for the currently selected text. The displayed style name is the style where the cursor is currently positioned. It includes: Paragraph, H1 to H3, Verse, and Quote.
-
Insert: To add different elements to your document, including: Bullet and Numbered Lists (supporting multi-level indentation), Images, Links, Tables, Horizontal Rule, and Code Blocks.
-
More (…): This dropdown includes some additional formatting and insert commands, including: Strikethrough, Inline Code, List Indent and List Outdent, and a tool to clear formatting for a text selection. Note that it’s always faster to use
TabandShift-Tabto indent and outdent lists. -
Dock / Undock: When the toolbar is docked, the Undock button is displayed. Conversely, when the toolbar is undocked, the Dock button is displayed.
7: Editor Window
You’ll do all your writing in the Editor window. The editor window will also display tabs providing non-editing functionality that require more space than can fit into the left panel, like Settings for example.
There are four ways to apply styles and formatting and to add elements to your page:
-
Floating Toolbar.
-
Right-click context menu.
-
Shortcut key combinations
-
Directly in the editor using markdown codes.
We have already discussed the floating toolbar. The right-click context menu provides access to often used styles, formats, and commands, and also includes different items depending on where you click. Relevant shortcut key combinations are displayed in menus and toolbar dropdowns, and a reference will be added to the documentation.
The fourth way to insert styles and formatting is using markdown code directly in the editor. For example, to create a new H1 heading, type # Your Heading Title, and to create a new H2 heading, type ## Your H2 Heading Title. The documentation will be updated to include details of the available markdown codes implemented in Nocturne Writer, but for now you can check CommonMark for more information. One key difference is that links are started with two left braces [[ rather than one.
An important tip for working with lists (bullets and numbers) in the editor: To exit from a list (meaning, to stop adding new numbers or new bullets to your list) just hit enter twice. This creates a standard paragraph style on the line immediately following the list. The same applies to the Quote style - hit enter twice to exit.
8: Footer
The Footer provides some basic information about the document you are working in: the number of words, the number of characters, the current line the cursor is on, and the current column in the line/paragraph.
Information and functionality presented in this area will continue to expand as Nocturne Writer grows.
Section 3: Setup Your Writing Environment
Section 4: Lets Start Writing
Step 1: Create a new file
Make sure that you are on the Workspace pane. Begin by creating a new page. Note that it is selected in the Workspace and the Tab Bar, and also has a blue circle in the Workspace. The blue circle means that the file is newly added to your book and is not yet being tracked for version control.
While you are typing, you will see the word ‘Editing…’ appear in the toolbar. This means that the file is being actively changed and has unsaved changes. Documents autosave, and once ‘Editing…’ disappears you know that the autosave is complete.
Try right clicking on your new file in the workspace - you will see that one of the options is Commit File. Committing a file means that the file is being tracked by version control, and that the commit records the set of changes made since the last commit. Since this is a new file, there were no previous commits. Go ahead and commit the file now.
Step 2: Modify your file
Add some more content to your newly committed file. You will see that now, a yellow circle appears next to the file. This means that the file has changed since your last commit. If you want to see what has changed, right click and select View History. This opens up a new window that shows you all commits made to this file so you can see the entire history of all changes that you have made. Clicking on a specific commit shows you what changed in that commit. Close the dialog.
Now right click on the file and select View Changes. This opens a new window that shows you exactly what content was added and removed since the last commit. It might look fairly technical, but that’s because it shows you the content with the accompanying markdown. Git is a precision tool, so even minor changes to a document will result in the document being flagged as changed. You can close the dialog without making any changes, but you also have the option to Discard your changes or Commit your changes. If you aren’t too tied to your content, trying discarding the changes. You will see that the document reverts back to it’s previous state at the time of the last commit. Note that discarding changes is a one-way trip - you cannot undo a discard, so take care.
Step 3: Add some headings
Now add some headings to your document, some H1’s, H2’s, and H3’s. It’s recommended to follow best practices when structuring your document, but Nocturne Writer doesn’t impose any constraints on how you setup your headings and structure your page.
In the editor, you will notice small downward-pointing chevrons in front of each header. Clicking a chevron will collapse that heading, and fold all subheadings and content underneath it. You can expand the heading and its content by either clicking on the chevron again, or by clicking on the ellipsis just below the heading.
You can also view the document structure (and navigate through a long document) by accessing the Navigator pane in the multi-panel toolbar. In the Navigator, you can click on a heading and the editor will scroll to the heading in the editor window. You can also promote and demote headings to different heading levels, and also drag and drop entire sections to completely reorganize your document.
Step 4: Add a link to another page
Content incoming….